Saturday, October 31, 2015

Daring Bakers Make Macarons! (And I try and fail.)

There's a wonderful blogroll called "The Daring Bakers," which hosts an equally wonderful baking challenge. Each month, a particular baking project (sweet or savory, well-known or obscure) is posted, and each of the daring bakers gets a month to complete it. I've done a couple of challenges in the past, but it's been a while now. With my blog recently revived, I thought it was time to step back into things.

But the thing with these challenges is that they're, well, challenging. My macarons don't look like macarons. They don't really taste like macarons (mostly because of texture). I labored for hours and ended up with pretty yummy, pretty chocolatey sandwich cookies. It was fun, and the instructions were good, but I think this is just the sort of thing that requires practice. Will I practice? I don't know. In any case, I'm glad to have given it a shot, and I figure, since I tried, I may as well post.

Blog-checking lines: For the month of October we got to take on one of many bakers’ deepest, darkest kitchen nightmares: macarons. Our talented bakers Korena from Korena in the Kitchen and Rachael from pizzarossa made the intimidating task of mastering these French beauties a breeze.

Ingredients (in grams. This recipe calls for weighed instead of volume-based ingredients)

For the Cookies (I used the recipe from the challenge)
  • 140 g ground almonds
  • 120 g powdered sugar
  • 20 g cocoa powder
  • 100 g egg whites (about 3 eggs), divided
  • 100 g sugar
  • 40 g water
You will also need: parchment paper or silicon mats for baking, a kitchen scale, a piping method (I used a pastry bag and a tip, but I hear that ziplocks with a corner snipped off work well too), a candy thermometer, and a mixer or hand beaters for the egg whites.

For the Filling (I improvised a ganache) 

  • 1 bittersweet chocolate bar (I used a 72% dark from trader joe's)
  • 1/4 cup half and half, plus 2 TBS milk if the ganache is too thick
  • 1/4 tsp almond extract (optional)

Procedure

For the Cookies (the daring bakers recipe is in straight text-- my comments are in italics)


  • Line two baking sheets with parchment paper or silicon mats
  • Mix the ground almonds and powdered sugar and cocoa powder together in a bowl, then grind in a food processor until you have an extra fine texture. You may need to do this in batches, depending on the size of your food processor. I had to do 2 batches in my little guy. I also started with whole almonds, so I ground those pretty fine before mixing them with the sugar and cocoa and grinding them together.
  • Sift into a large bowl (I use a mesh strainer and push the mixture through with a spatula), putting any bigger pieces of almond back into the food processor to re-grind. This took quite awhile, maybe because my strainer is pretty little. 
  • Add 50g egg whites and mix thoroughly into the almond mixture. This can be pretty tricky to get exactly right. Do your best!
  • In another bowl, beat the other 50g egg whites to stiff peaks. 
  • Meanwhile, put the granulated sugar and water into a small heavy-based saucepan and heat on medium-low to 118°C / 244°F, without stirring. OK FOLKS! Here's where I screwed up! I'm almost sure of it. And, y'know, there's something to be said for failure. It's disappointing, but it doesn't have to lead to a complete disappointment. I still got reasonably tasty meringue-like cookies with a marvelous ganache filling. And yeah, I'm sad they weren't real macarons, but that's just what happens sometimes. So, I think what happened is that my thermometer wasn't quite accurate, and I pulled the sugar syrup just a little too soon or a little too late, so that when it hit the egg whites it turned them back into mush. To be honest, in that moment I thought of starting over with that part of the process and keeping my almond mix intact, but I felt bad about wasting that many egg whites (I've been trying to be more conscious of the environmental impact of dairy consumption lately), so I decided to go forward and see what would happen. Choices, folks. That's life. Moving on!
  • While whisking constantly on low speed (to avoid splashing hot syrup), slowly add the cooked sugar mixture to the beaten egg whites, pouring it down the inside edge of the bowl. You’ll get a bit of it hardening on the side of the bowl, but that’s okay – just leave it there. 
  • Whisk at high speed until the mixture is cool, about 3 minutes. The mixture should increase in volume and become firm and shiny, and it should be thick and marshmallowy when you lift the whisk. 
  • Scrape the meringue onto the almond mixture and incorporate with a rubber or silicone spatula. You do actually want to get a lot of the air out of the mixture you do this by folding and squashing the mixture against the side of the bowl, rotating the bowl a quarter turn with each fold. Be sure to firmly scrape the bottom of the bowl with the spatula, so you don’t leave a layer of almond paste there. 
  • Mix until you have a homogenous batter that runs from the spatula in a thick ribbon.  
  • Transfer the mixture into a piping bag fitted with a 7 9mm / #10 - #12 plain round tip  (this is SO HARD to do! Batter everywhere! Everywhere, I tell you!). Pipe 60 equally sized rounds, about 1 1/2” in diameter, in staggered rows onto the prepared sheets. Hold the piping bag upright with the tip just above the sheet and pipe without pulling upwards or swirling in circles, so the batter comes out in a round blob around the tip, and give a little sideways flick at the end to break the stream. (As you can see, mine were not perfect)
  • Tap the baking sheet firmly on the bench several times to release air bubbles and obtain a smooth surface. If you have any tips sticking up, press them gently down with a damp fingertip. 
  • Pre-heat the oven to 300°F and leave the tray to rest at room temperature for at least 20 minutes until a slight skin forms. If you touch it, it should be only just tacky. Because mine were messed up, they didn't get tacky and stayed pretty liquidy. 
  • Bake the macarons in the centre of the oven for 18 minutes (20 minutes if using cocoa in the shells), one sheet at a time, turning the sheet half-way. 
  • Remove from oven and remove the parchment from the tray with the shells still on it and place on a cooling racks for at least 30 minutes, until completely cool, then remove macaron shells carefully from the parchment. 
  • If not filling straight away, store in an airtight container at room temperature, separating layers with parchment. Otherwise, fill and store in an airtight container in the fridge to mature for at least 24 hours before eating. 
For the Ganache
  • Pour the half and half into a microwave-safe bowl and microwave for about 1 minute until the mixture is quite hot but not boiling and a little skin forms on top. (There are people who would say that this is a terrible way to heat milk, but it's always worked for me when it comes to ganache)
  • Break the chocolate bar into smallish chunks and add to the hot milk. Let sit undisturbed for a couple minutes, then stir to incorporate all the melty chocolate. If the mix is too thick, add in just a little bit more milk (or you could use cream). Stir in the almond extract.
  • Spoon a nice layer of ganache on 30 of the cookies and use the other 30 to make adorable little macaron sandwiches. 
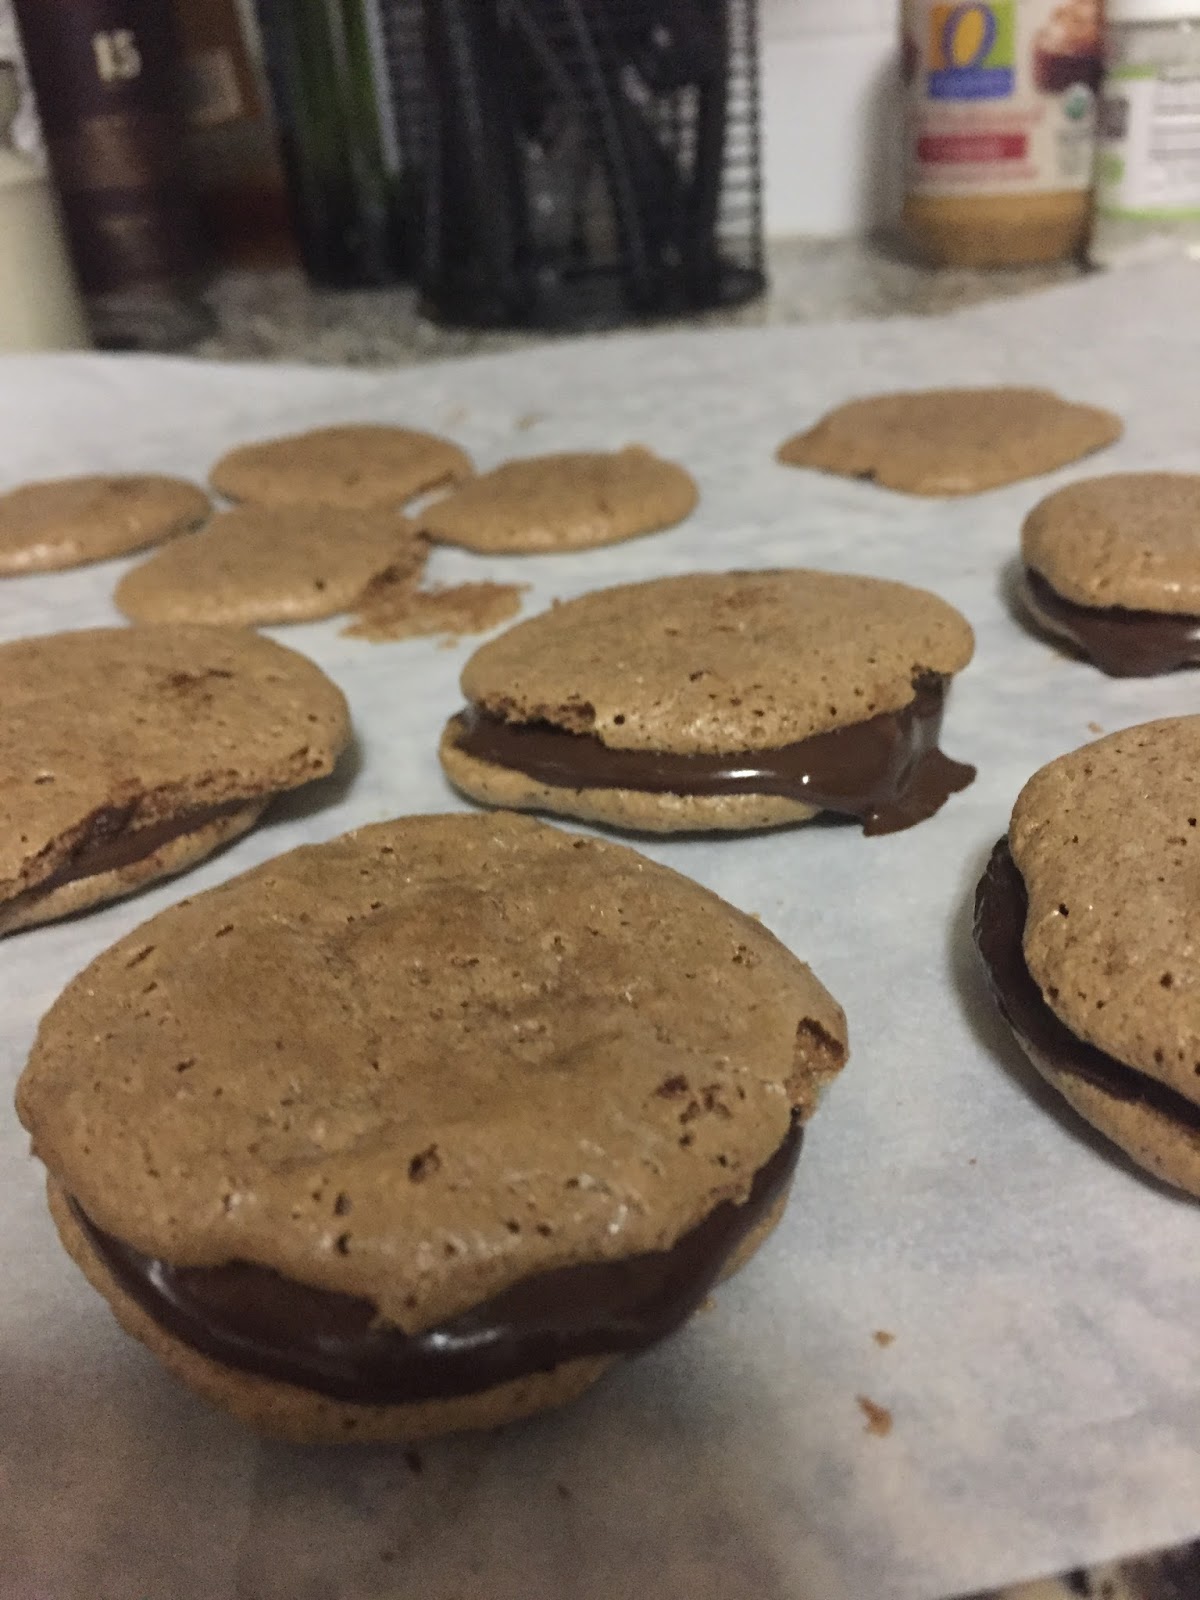
Are these macarons? No! Did I labor for hours and end up with flat cookies? Yes! Are they chewy? Yes! Are they yummy? Yes! Do I regret doing this? No! Am I glad to be back involved with Daring Bakers again? You betcha! Thanks, Rachel and Korena, and Bring on November!

Tuesday, October 27, 2015

Chocolate Chip Pumpkin Bread


I'm not sure if any of y'all have noticed, but there's this rather notable obsession with pumpkin in the American sphere these days. And by notable I mean in-your-face-all-the-time-everywhere-you-go-everything-is-pumpkin-and-pumpkin-spice-and-it's-insane-from-September-to-Halloween. I like pumpkin. I like pumpkin spice. I am not nearly as head over heels for the stuff as many other folks.

I do adore pumpkin bread. Apparently I always have. The recipe that I use is one that my mom requested from my marvelous preschool teacher, Harriet, who was my saving grace at the JCC. I was a rather difficult kiddo there. Mostly because I couldn't stay still.  I had my own way of doing things. Like playing with crayons by standing on a table and throwing them around the room instead of, y'know, drawing. One of my earliest memories is having to spend the school-wide shabbat celebration in the hallway instead of in the social hall with all of the other preschoolers, because I got just a little too enthusiastic about the prayers and songs. Harriet could have made me sit quietly and not participate at all in order to reinforce that I needed to follow the rules if I wanted to have fun. Instead, she came out to the hall with me and said "We'll do our own shabbat." We sang the songs. We celebrated. 20ish years later, I decided to become a rabbi. Thanks, Harriet. And thanks for the best pumpkin bread in the world.


Ingredients (modified slightly from the original)- makes 2 loaves

  • 4 eggs
  • 1 3/4 cups sugar
  • 1 cup oil
  • 1/3 cup water
  • 1 can pumpkin (or about 2 cups fresh cooked)
  • 2 1/2 cups white flour
  • 1 cup whole wheat flour
  • 2 tsp baking soda
  • 1 1/2 tsp salt
  • 2 tsp cinnamon (or more if you love cinnamon)
  • 1 1/2 tsp ground ginger
  • 1/2 tsp cloves
  • 1/4 tsp nutmeg
  • 6 oz mini chocolate chips

Procedure

This is a quick bread, which means that wets and dries are mixed separately and then combined. You'll need 2 loaf pans for this, and I imagine these could also be made as muffins. You might have to adjust the baking time. 
  • Grease your loaf pans well and pre-heat oven to 325°F
  • Beat the eggs and sugar together and stir in the oil, water, and pumpkin
  • In another bowl, mix the flours, baking soda, salt, and spices
  • ok, ok, so I cheated and put it all in the bowl with the wet stuff. 

  • Stir the flour mix into the egg mix, taste (yes, I know there's raw egg-- get over it), and add more spices if you'd like. I almost always end up adding more cinnamon.
  • before
    after
  • Stir in the chocolate
  • Divide the batter between the two loaf pans, dot the tops with chocolate chips if you'd like, and bake for about an hour and fifteen minutes. A knife should come out clean. Depending on your oven, it may take significantly more or less time. I'd check after an hour. Mine usually seems to take more time than expected.
  • Remove from the pans after about 5 minutes, but don't try to slice more than the piece you're gonna gobble warm from the oven. It'll be much easier to slice once it's fully cooled. 
  • Try not to eat it all in a day. It's tough. 


Saturday, October 17, 2015

Sun-dried Tomato and Brussels Sprouts Carbonara

Hi. This is not a healthy post. In fact, it's a decidedly unhealthy post. But this week I had to get some blood work done, and apparently I've got such great cholesterol levels they warranted an exclamation point in my doctor's notes, so I've decided that for tonight my tastebuds are gonna beat my health sensibilities. Tonight, my friends, we make carbonara.


The first time I remember anybody around me eating carbonara was during my first time in NYC when I was 11. My dad took me along on a business trip. We went to see "Beauty and the Beast" on Broadway, and before that we got dinner at some Italian place, because I was the pickiest eater known to man at that time in my life, and I probably needed to find pasta with butter and parmesan cheese and possibly broccoli. Truth be told, I have no memory of my dinner from that evening, but I do remember my dad looking very pleased as the waiter came over, cracked an egg into a dish, mixed it up, mixed it into a hot pasta concoction, and placed the whole thing in front of my dad. I thought it was disgusting. My dad thought it was delicious.

Well, I'm no longer 11, and although I only experienced authentic, meaty carbonara on a couple of occasions before deciding to be a vegetarian, I know it's good. So's this. The sun-dried tomatoes add a flavor burst that, while not mimicking pancetta in flavor, gives a similar zingy effect. The egg and half-and-half are just as creamy as could be, and once you put parmesan in anything it gets 1000 times better, yeah? The brussels sprouts were more of an afterthought for me. I like putting veggies in my pasta for diversity of texture, and I thought this could be a nice change from the typical spinach and mushrooms.


Ingredients

  • 1/2 lb brussels sprouts, washed, ends trimmed off
  • 1 tbs butter + 1 tbs oil, or 2 tbs of one or the other
  • 3 cloves garlic, thinly sliced
  • 6 oz pasta of choice
  • 1/4 cup diced sun-dried tomatoes (mine were dry, not oil-packed, but either will work)
  • 2/3 cup half and half, cream, whole milk, or a combination (the consistency of the final sauce will be thicker the higher the fat content)
  • 1 egg
  • 2 tsp mustard
  • 1 tsp dried basil
  • dash garlic powder (optional)
  • 2/3 cup parmesan cheese (fresh is best. if you don't have it, use whatcha got)
  • salt and pepper to taste
Procedure
  • Melt the oil and butter together in a frying pan over medium heat. Add the garlic and cook, stirring, for a minute or two until fragrant. 
  • Place brussels sprouts into the pan, turn to low, and cover. Let cook for 15-20 minutes, stirring occasionally, until sprouts are crispy on the outside and tender on the inside. 
  • before
    After
  • While the sprouts are cooking, cook your pasta.
  • Mix half and half, mustard, egg, and a dash of salt and pepper together
  • When the pasta is done, drain (but don't rinse!) and add to the sprouts. Pour in the egg mixture and add in the basil, tomatoes, and cheese. Cook over low heat, stirring, until the mix comes together (about a minute). Eating undercooked eggs is scary. Eating pasta with scrambled eggs is not the goal. Use your best judgement. Taste and add salt and pepper and/or more cheese as needed. Serve and enjoy.


Friday, October 2, 2015

Pasta with Burst Tomatoes


So it's fall. And that's great. That's really great. But it being fall means saying goodbye to summer, and, with that, to many wonderful foods. I love little tomatoes. Cherries, grapes, mini heirlooms, whatever. You can still get them in the winter, but the ones in the summer are better on every level. So, normally,  I treat them as a summer-only food.

I wanted one last gasp of summer cooking, so when I went shopping a couple days ago I bought a box of little tomatoes, and then I burst them. The results were simple and delicious.

Ingredients
  • a couple glugs of olive oil
  • 3 large cloves garlic, sliced
  • 1/2 tsp dried basil
  • 1/4 tsp dried oregano
  • a handful of fresh basil, if you've got it
  • 1/2 lb small tomatoes
  • 1/2 lb pasta
  • salt and pepper to taste
  • grated parmesan, romano, asiago, or any other cheese you like for serving
Procedure:
  • Cook pasta according to package directions. Make sure to save a bit of cooking water. While it's going:
  • Heat a glug of olive oil over medium heat. Add the garlic and dried basil and oregano and cook, stirring, for a few minutes, until it starts to soften.
  • Add in the chopped basil, another small glug of oil, and tomatoes and turn the heat up a bit. Let the tomatoes cook for 5-8 minutes, stirring  until they start to crinkle and burst at the seams. 
  • Into the Pan
    2 minutes in
    5 minutes in
  • Drain the pasta if you've not already done so and stir about a half cup of the cooking liquid into the tomatoes, letting the tomatoes begin to absorb it.
  • Mix the pasta into the tomatoes and give it a minute to all come together. 
  • Season with salt and pepper, and pass the cheese please!