Sunday, October 30, 2011

Better Late than Never- Daring Bakers' Povitica


Hey Folks. Long time, once again, since my last post. I'm gonna try and be a better blogger, I promise.

Last month, I finally joined "The Daring Bakers." It's a really fun blog list that gives little baking addicts, like myself, an excuse to bake one particular item every month. Sometimes it's a traditional but hard-to-make item like last month's croissants. Other times, it's a not-as-hard-to-make but slightly rarer item like this month's: Povitica.

Povitica is an Eastern European, filled, yeasted coffee cake, somewhat akin to a babka. There are definitely differences, however, and both are fun to make in their own way. For this month's "challenge," we daring bakers were asked to bake one povitica with a traditional walnut filling, and we were welcome to play around with other fillings of our own. I opted for a variation on the walnut with a southern twist-- praline. (This year's pecans are just now being harvested, and we picked up a bag att yesterday's farmers' market.) All in all, the potivica was a really fun project...although I don't think it could ever really replace chocolate babka.

The main recipe used by all daring bakers can be found here. I made a few small changes. I used skim milk mixed with a touch of cream in place of the whole milk, and when I rolled out the dough, I sprayed it with pam rather than putting more butter on top. I also used salted butter and decreased the salt in the recipe slightly.


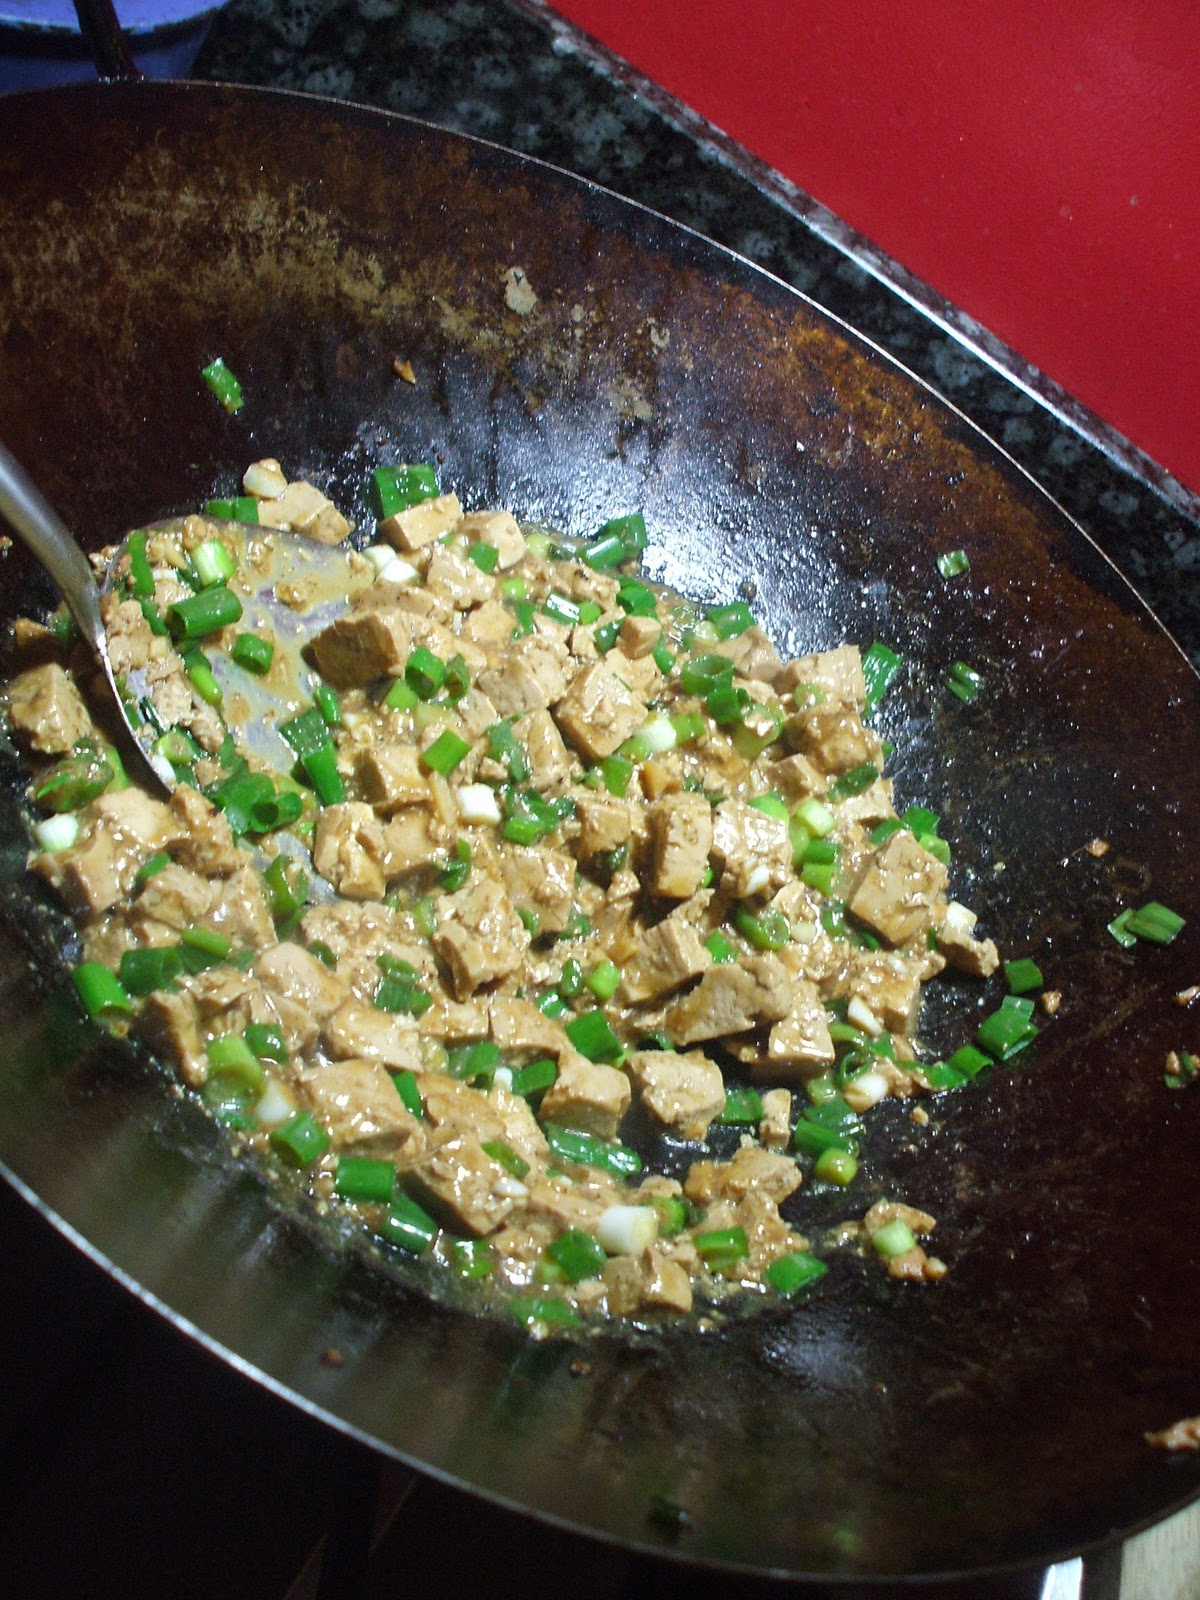
This is my filling recipe, prepared the same way as the traditional:

Praline Filling Ingredients (for 1 loaf)
-1 3/4 c. ground pecans
-1/4 c. milk 
-1/4 stick butter
-1 beaten egg yolk
-1/2 c. packed brown sugar, plus 1-2 TBS white sugar
-1/4 tsp. butter extract


Potivica is prepared much like any other yeasted sweetbread at first. Yeast, milk, eggs, sweetener, oil or butter, flour, kneading...a good recipe for yum. 


After the rising, it's rolled out to a small-pizza sized round, and then really rolled out until it's almost paper-thin. 

(As you can see, I didn't quite get that far.)


After the rolling, it's time for the filling. I actually ended up using my hands for this, after I spooned it on, to make it nice and even. 


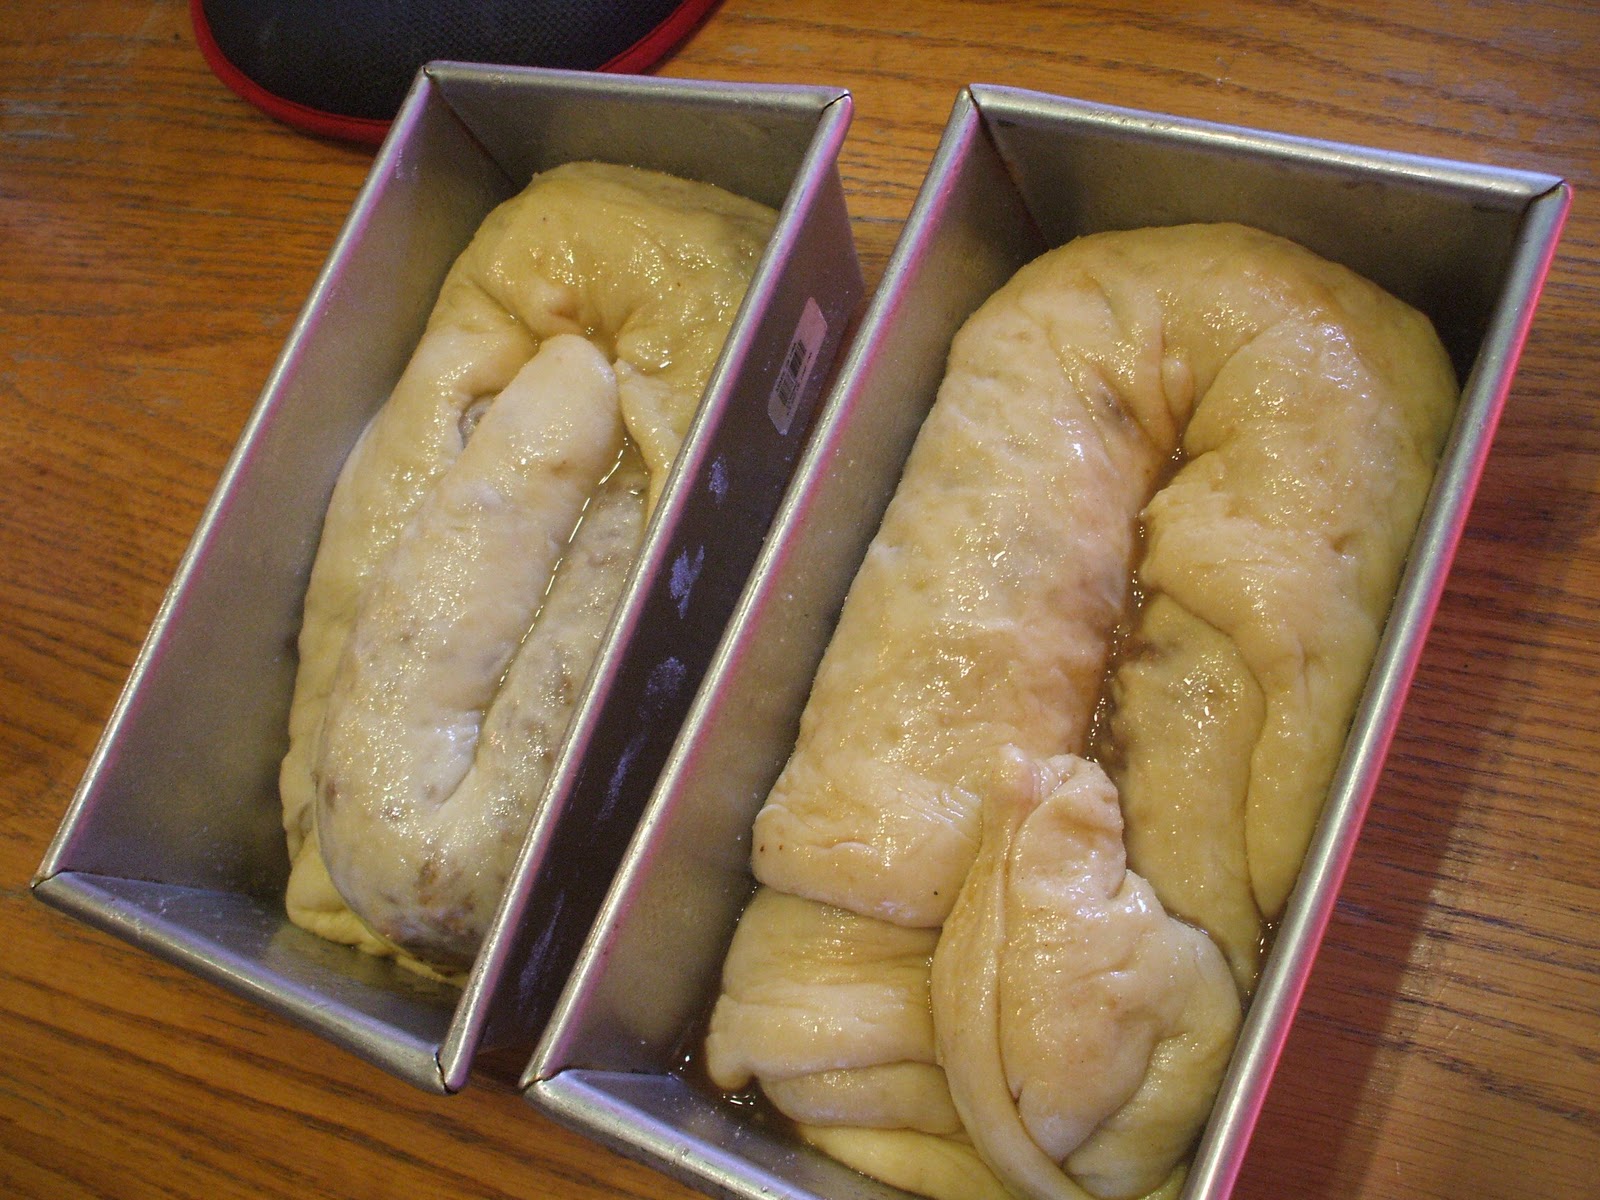
The loaves are rolled up, carpet-style, and then twisted in upon themselves in the loaf pans. I didn't get mine quite as swirly as I'd hoped, but I was worried I'd break them if I kept tugging. 


After the loaves come out, they have to cool for quite awhile or they'll turn to crumbly gook when sliced. 


Mmmmmmm....potivica. 

Thursday, October 13, 2011

Spinach Triangles (Spanikopita)

I really need to work on my "food-tography" skills.  Part of it's that I'm lazy and don't take as much time to set up shots as I ought to. Part of it's that I'm often taking pictures of dinner, which means often taking pictures without any good, natural lighting. Part of it's my camera; I think at this point an iPhone would be just as good. It was cheap when I bought it, and that was five years ago. One of my goals for this semester is to save up enough from my work to buy myself a decent camera. I still haven't decided whether to go for a high-endish point and shoot or just go whole hog and get an entry-level SLR. A lot of it will come down to the money. Anybody have any recommendations?

It's fall now, officially, and that means pumpkin. My favorite pumpkin recipe is my preschool teacher's Chocolate Chip Pumpkin Bread, and I had a lovely time making some a few days ago. It's the best pumpkin bread ever. Don't take my word for it. Try for yourself. You'll thank me later. Harriet's Chocolate Chip Pumpkin Bread.

I've always liked Pumpkin Bread, but for most of my childhood I despised spinach. Not only that, I despised cheese, except for parmesan. Luckily, that's changed, and hence I've come to enjoy many lovely dishes. One of them is spanikopita. Spanikopita is traditionally served as a casserole, but my family often prefers to make triangles, which are less messy to eat and can be easily popped in the toaster oven for reheating. The only slightly eccentric ingredient here is phyllo dough, but that should be easy enough to find in the grocery store's freezer aisle. Stick it in your own freezer where it'll keep for ages, then stick it in the fridge the night before you plan to make the triangles so it can thaw.

Also, just so y'all know, I do not claim this recipe as authentic in any way, shape, or form (although for all I know it's exactly how all the Greek grandmothers of the world make it); I just claim it to be delicious.

Ingredients (makes 18-21 small packets)
-1 TBS olive oil
-1 large onion or 2 small, diced
-3 cloves garlic, minced

-dried dill, basil, marjoram to taste (I used about 1.5 tsp of dill and 1/2 tsp of basil and marjoram)
-salt and pepper to taste (probably about 1/2 tsp. of each)

-1 10 oz. package of frozen spinach, preferably thawed (fresh is great too)
-1 egg
-3 tbl flour
-1 cup feta cheese
-1 cup cottage cheese (optional)
-18-21 sheets phyllo dough, thawed
-canola oil, olive oil, melted butter, or pam


Procedure
-place the olive oil and about 1/2 tsp of salt in a large saucepan over medium heat. Add the onion and herbs and cook for about 5 minutes until golden and soft. Add the garlic and cook 2-3 minutes more. 
-Add your spinach and cook, stirring occasionally, until the spinach is nicely incorporated and the mix is warmed through. If you're using thawed frozen spinach, this shouldn't take long. If you're silly like me and forget to thaw it first, you'll find yourself waiting awhile on this step...and possibly whacking at the frozen block with a cooking spoon. Whoops. Taste the mix and see if it needs more herbs. Remember that the feta will add saltiness. 
-Take the spinach mix off the heat and crack an egg into it. Add the flour, feta, and cottage cheese (if using). Mix well. 
-Now comes the fun part. Working with phyllo isn't that complicated once you get used to it, but it can be a bit tricky. The best advice I can give is to be very gentle and be  forgiving of yourself. If a piece rips, you can probably still use it. So don't worry. 
-Take the phyllo out of the package and gently lay it out on a countertop. Put a large cutting board beside the phyllo and very carefully move one sheet of phyllo from the pile to the cutting board. Brush gently with oil or melted butter, or spray with pam/olive oil. Repeat this with two more sheets (so you have a pile of three), then cover the remaining sheets with a clean dishtowel so they don't dry out. Each pile of three sheets will make three triangles.

-Cut the three sheets of phyllo into thirds, lengthwise, and place a heaped TBS of filling on the bottom of each piece. Now, here comes the tricky part. Take one corner of each piece and fold it diagonally over the filling to form a triangle. Then, fold the triangle towards the top of the sheet, so that the filling is closed off to the air on two sides. Continue to fold like a flag until you reach the top of the sheet, then tuck the ends under. If that description's too confusing to follow, watch the last minute of this video I just found on youtube: http://www.youtube.com/watch?v=FVnbFR4SnGU.
-Place the finished triangles on a greased baking sheet and cook at 350°F for about 20 minutes until crispy and golden. Alternatively, bake only as many as you want for your meal and freeze the remaining triangles to bake another day. 
-You could be properly organized and serve the triangles alongside a greek salad. Or you could have them with chips and guacamole (thanks, dad) and apples and honey (thanks, mom). No idea quite what inspired them to stick those sides on the table....


Monday, October 10, 2011

Hong Kong-Style Tofu

My first attempt at Hong Kong Tofu- Yunnan, China
When I lived in China I cooked--a lot. This was a result, I think, of being a vegetarian, having amazing fresh veggies/eggs/noodles/tofu at my disposal, needing to make sure most things I ate were cooked so as to avoid disease, and having simultaneously too much and too little free time on my hands. Cooking was, essentially, a slightly hectic equivalent of a stress ball. I could easily maintain control of it (most of the time), it provided some challenge,and it helped me relax.

My time in China was amazing, but it was also the most personally and professionally-challenging year I've experienced. I guess that's a big part of what made it so amazing. I'm still sorting through what I got out of my time in Yunnan and how the person I am now differs from the person I was last summer.

A market in Kunming, Yunnan, China

 My American co-worker last year, Mark, split his childhood between Rochester, NY, and Hong Kong. His father is a Hong Kong native, and although Mark always attended international school, at home he experienced a lot of Hong Kong culture, including his father's cooking. It took months and months of cajoling to get Mark to finally make Hong Kong Tofu for our middle school's team. Being the cooking geek I was, I stood behind him in his improvised kitchen, watching as he tossed marinated tofu from the wok into the air, jealous of his ability to somehow catch it all again instead of watching it splatter to the cement floor. (His advice, courtesy of his father: practice tossing cubes of bread first-- they're easy to clean up.)

The next day, I rode my bike into town, visited my "tofu lady" at the market, and bought a piece with which to attempt to recreate Mark's recipe. Of all the foods I miss from China, none perhaps matches my wish for freshly-made tofu. I'd eat the stuff raw. When I got back to the States and bought my first American tofu in over a year, the spongy texture and absolutely flavorless palette were almost more than I could take. I've readjusted, but, alas, I fear no tubbed grocery strore tofu can possibly match up to the majesty that is freshly-cut market tofu.

Well, I'll stop the China talk for the time being. Stick with this blog and you'll doubtless encounter more. Or you can check out my old China blog: http://anamericaninheqing.blogspot.com. For now, on to Mark's recipe (keeping in mind that neither he nor I was in possession of anything resembling measuring cups/spoons. This is all very approximate):

Ingredients (for marinade)
-1 standard package tofu, drained and pressed
-1/4 cup soy sauce
-2 TBS rice vinegar
-2 TBS rice wine
-2 TBS sesame oil
-2 cloves garlic, minced
-1 inch piece ginger, minced or grated
Marinating Tofu
-1 tsp. sugar or honey
-hot pepper powder to taste


Marinade Procedure: Pretty simple. Whisk all ingredients but the tofu together. Slice tofu into cubes and place in a wide, shallow dish. Add the marinade, flip tofu pieces a bit, and cover with plastic wrap. Let sit for at least a couple hours at room temperature, or (preferably) place in the fridge all day or overnight. It's worth tasting a piece or two of tofu an hour or so in to check for flavor balance. Add more of anything you like. 


Ingredients (other)
-1 TBS vegetable oil
-1 bunch of scallions, whites and greens chopped
-2 tsp. cornstarch
-1/4 cup water (plus more, if needed)


Procedure
-Heat the vegetable oil in the wok over medium-high and use a slotted spoon or spatula to place the tofu in the wok, leaving the bulk of the marinade in the dish. 
-Use a spatula or wok utensil to toss the tofu. You're not aiming for crispy here, but you do want it to get nice and hot.
-After a few minutes, remove the tofu to a plate or bowl, leaving the wok on the heat. Pour the water into the wok and add the cornstarch, letting the flavors crystalize as the sauce thickens slightly. 
-Add the tofu back in, along with the scallions and some of the marinade. You can continue to add all of the marinade if it's not flavorful enough. If it's too flavorful, you can add a bit more water to dilute it. 
-Continue to cook, tossing occasionally, until the sauce is nicely thickened--this definitely isn't a soupy dish. Any excess liquid will evaporate as you cook, or if you're in a hurry you can add a bit more cornstarch. 
-Serve over rice. For a more complete meal, add another stir-fried vegetable or two.


Hong Kong Tofu in Columbus, GA (with rice, bok choy, asparagus, and jasmine tea)

Sunday, October 9, 2011

Sometimes Simple is Just Best- Pasta with Eggplant and Marinara

I'm behind on my blogging. Very behind. I have several good excuses, however. I started a new job, I spent two weeks cramming like mad for the Foreign Service Test, and I celebrated two of the most important Jewish Holidays of the year. Still, that doesn't change the fact that I've not been blogging and that's rather unfortunate. I'm now back at it and intend to stay that way!


My favorite smells in the world are fresh basil and freshly ground coffee (not at the same time, of course). Coffee, luckily, is something I can smell all-year-round in the States, but basil is about to slip out of my life for some months. I already miss it.

Georgia changes seasons a little later than the northern parts of our beautiful country, so it's only in the last week or so that we've started to experience real fall. The recipe I'm posting today was a supper cooked right on the edge of summer, peaking over into autumn, but it's the sort of thing that's good any time and super easy to throw together. To be perfectly honest, this isn't even the sort of thing I'd typically use a recipe for. It's more of a formula that can be changed up as needed to accomodate different vegetables and the like.

Ingredients
-1 lb box pasta of choice (I prefer shapes to spaghetti-type noodles for this sort of chunkier sauce)
-2-3 TBS olive oil
-3-4 Japanese eggplant, ends trimmed, cut into strips (I prefer Japanese eggplant, but traditional round eggplant will also work)
-dried basil and oregano (for the eggplant)
-2-3 medium tomatoes
-1-2 small peppers (red are great if you have them, but whatever works for you)
-2-4 cloves of garlic, minced
-sprigs of fresh basil, leaves removed and cut or torn into smaller pieces
-1-2 cups of commercial tomato sauce or 1 can of diced or pureed tomatoes, undrained
-salt and pepper to taste
-parmesan cheese, to serve


Procedure
-Prepare the eggplant: preheat the oven to 450°F, brush some olive oil onto a baking sheet, and place the eggplant strips on top. Brush the strips with more olive oil and sprinkle with salt, pepper, dried basil, and dried oregano. Use a spatula to flip the strips around and try to get an even coat. Bake 15-20 minutes, until soft and slightly crispy. If the outsides are too pale for your liking, you can use the broiler for a few minutes at the end, but watch carefully so they don't burn!
-While the eggplant is baking, put up a pot of water to boil and prepare the pasta. 
-Chop the peppers and tomatoes into medium-sized chunks (large dice, perhaps)
-Heat a saucepan and swirl in about a tablespoon of olive oil, along with a bit of salt (kosher or other coarse is great, if you have it)
-Add the garlic and cook over medium-low heat, letting it slowly cook without browning. After a minute or two, add the peppers and cook together, then throw in the chopped tomatoes and basil. 


-Let simmer for a few minutes until the vegetables start to break down somewhat but the peppers retain a bit of crunch.
-Stir in the canned sauce or tomatoes. I almost always use tomatoes for this, but it so happened that when I made this a couple weeks ago we had half a can of tomato sauce that really needed using up. If you're using canned tomatoes, you'll likely want to add more salt and perhaps more oregano, and a little drizzle of balsamic or red wine vinegar is lovely.
-Leave to cook for another few minutes, until warm and bubbly. Season to taste.
-Mix the drained pasta with the eggplant and sauce and serve with grated cheese, and perhaps a fresh-baked loaf of sourdough.