Friday, November 18, 2011

As American as....

(I was gonna take a shot of the whole thing...but pie doesn't last long here)
                           

It finally happened. I'd been planning on baking a pie since I stepped off the plane from China months ago. An apple pie, of course, as that is the best kind. However, I didn't make an apple pie right away. I didn't make an apple pie for months and months, because it wasn't apple season. But now it is apple season! The apples are beautiful and copious and among the cheaper fruits to buy.


I didn't buy the apples for this pie. My Dad did. You see, he really likes apple pie. About once a day for a week or so, he talked about how he wanted an apple pie. Then he went to the store and bought apples... lots of apples. I took care of the rest.

There was a wonderful moment with my Mom as well.  Most of the time, when I want to bake something, my mother begs me to use a recipe and I gripe about it and try to improv my way to a layer cake/loaf of bread/chocolate chip cookie. However, as I had not made an apple pie for some time, I thought it best to consult a recipe. Naturally, I asked my Mom which one I ought to use. And, get this, folks... she doesn't use one! Which gave me a perfect excuse not to either, although I did consult a few along the way.

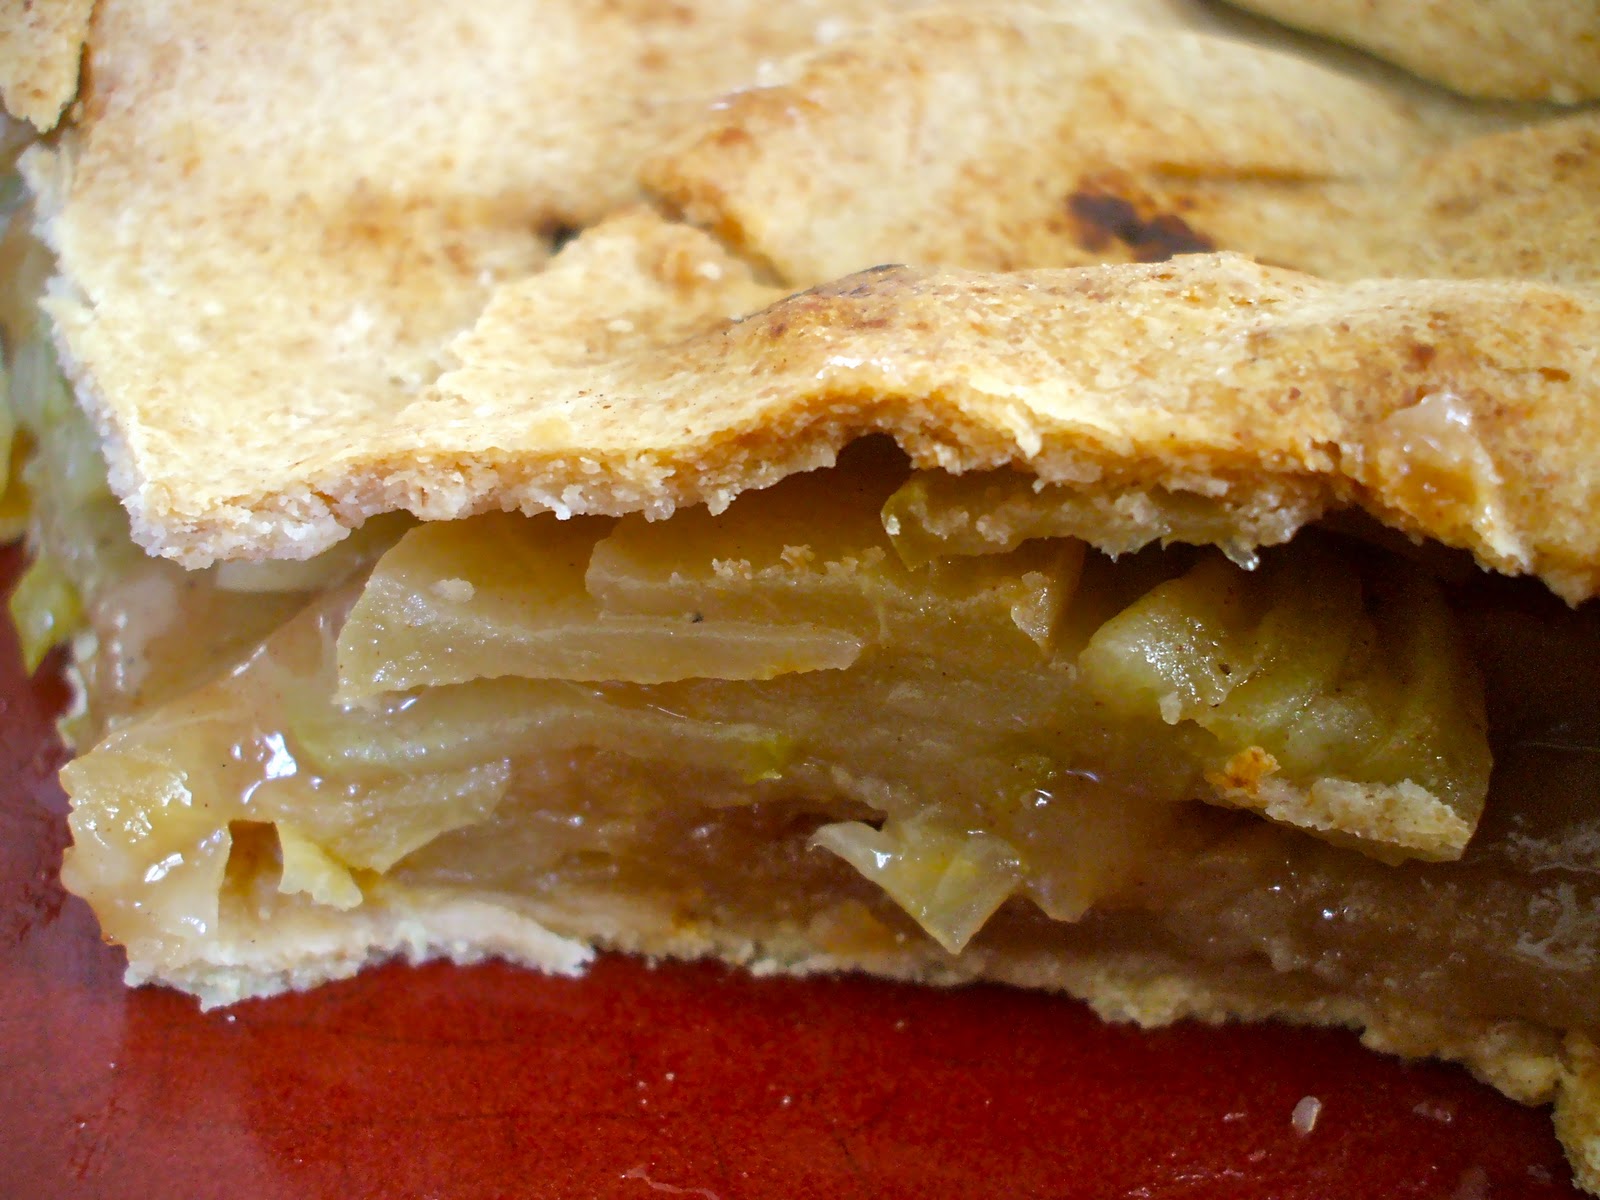
The results: buttery, appley, cinnamony goodness...gone in 24 hours.

Ingredients (Crust)
-3 cups flour (I used 2 cups all purpose and 1 cup whole wheat)

-1 tsp salt (or to taste)
-1 tsp ground cinnamon
-1 TBS sugar 

-10 TBS butter, cold and chopped into small pieces
-3 TBS cold water


Procedure
-Mix the dry ingredients thoroughly, then cut in the butter by hand with two knives, with a pastry cutter, or in a food processor. When you're done, the butter should be in no-larger-than-pea-sized lumps. Add water as necessary. When you think the crust is just a little too dry, stop adding water and just mix patiently until it comes together. Sometimes mushing it together by hand helps. 
-Divide the crust in half and roll out one half to a thin layer a bit big for your pie dish. Gently lift it into the dish, pat into place, and trim the edges so that they're just draping over the sides. (You should probably use scissors or a knife or something to do this, but I've never bothered. That's what hands are for.)
-Place filling (see below) in the crust and top, gently, with the other rolled-out half. Same deal with trimming, making sure you leave enough to pinch the edges of the two crusts together. I had enough crust left over to roll a thin snake to lay out on top of the border, so you can feel free to do the same, or just use it all for lambs' tails (more on that in a minute)
-Poke some holes in the top with a fork, or if you want to be fancy make some small cuts with a sharp knife. 


Ingredients (Filling)
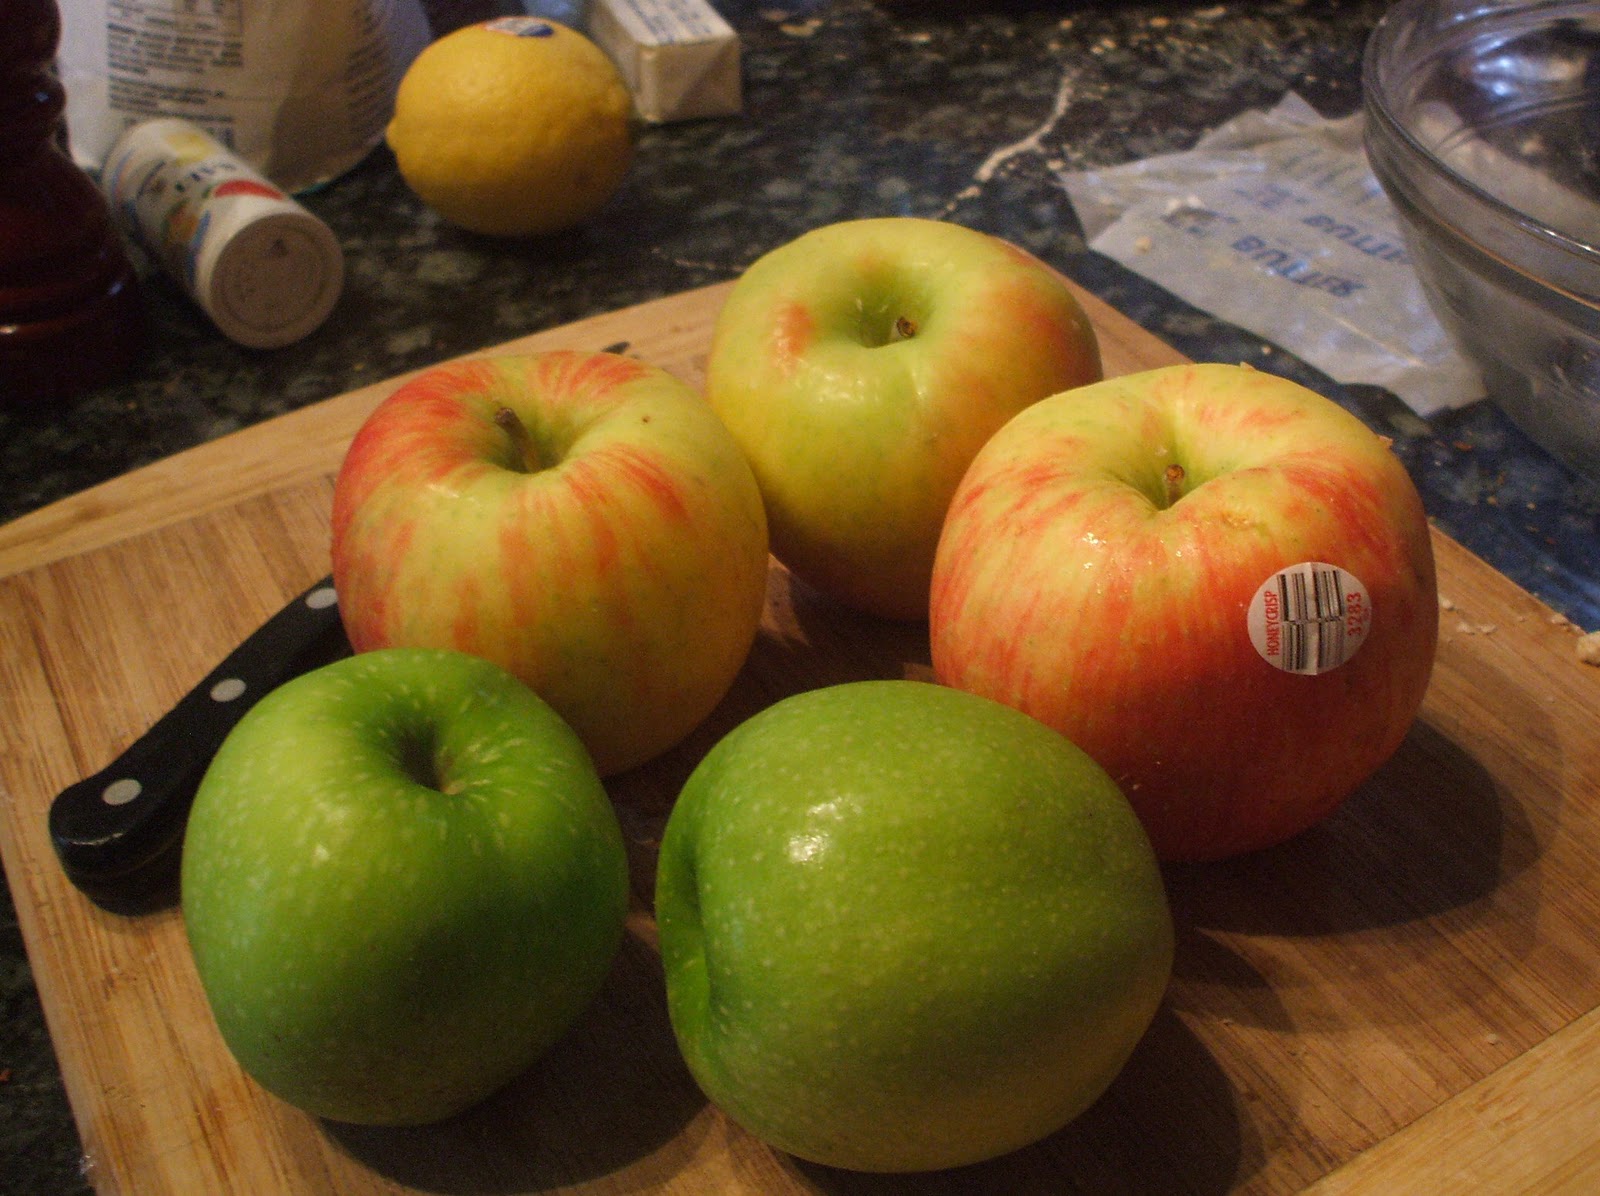
-About 6 medium apples (I used some honeycrisp and some granny smith) cored, peeled if you like (I usually peel about half), and sliced thinly.
-2 TBS lemon juice
-2 TBS flour
-sugar and brown sugar-- this is where subjectivity really comes into play. I like a less sweet and more appley apple pie, so I use less sugar than many would, but I still throw in more than some folks. I'd say I put in about 1/4 cup white sugar and 1/2 cup brown sugar. Just keep tasting until it's sweet enough for you. I honestly didn't measure. 
-1/2 tsp. salt
-1.5 tsp. cinnamon
-1/4-1/2 tsp nutmeg and cloves (to taste)
-1 TBS corn starch

Procedure: Mix it all together, gently but thoroughly. Doesn't get much simpler than that. Place atop the bottom crust. If it looks like too little filling, you can add another sliced apple. 


Baking: Top your pie with cinnamon sugar, if you like, and bake at 425°F for about 25 minutes, then turn down to 350°F and cook for 30-45 minutes more, until the filling is nice and bubbly and the crust is golden. If the top starts getting too brown, you can cover it loosely with aluminum foil. 


The biggest problem with apple pie is that it has to cool for, like, hours. Many hours. Luckily, lambs' tails don't, and they're a cinch to make. Just take your leftover crust, roll it out, top with brown sugar or cinnamon sugar, roll up carpet-style, and cut into pieces a few inches long. Place in the oven alongside your pie and bake for 10-15 minutes, until puffy and golden. Cool for about 10 minutes, and munch. Bide your time until you can get this:


Oh... and I know I didn't use any macintoshes, but this one's for Steve, creator of each and every computer my family's ever owned (yes, including the MacBook I'm typing on). We miss you.


Sunday, October 30, 2011

Better Late than Never- Daring Bakers' Povitica


Hey Folks. Long time, once again, since my last post. I'm gonna try and be a better blogger, I promise.

Last month, I finally joined "The Daring Bakers." It's a really fun blog list that gives little baking addicts, like myself, an excuse to bake one particular item every month. Sometimes it's a traditional but hard-to-make item like last month's croissants. Other times, it's a not-as-hard-to-make but slightly rarer item like this month's: Povitica.

Povitica is an Eastern European, filled, yeasted coffee cake, somewhat akin to a babka. There are definitely differences, however, and both are fun to make in their own way. For this month's "challenge," we daring bakers were asked to bake one povitica with a traditional walnut filling, and we were welcome to play around with other fillings of our own. I opted for a variation on the walnut with a southern twist-- praline. (This year's pecans are just now being harvested, and we picked up a bag att yesterday's farmers' market.) All in all, the potivica was a really fun project...although I don't think it could ever really replace chocolate babka.

The main recipe used by all daring bakers can be found here. I made a few small changes. I used skim milk mixed with a touch of cream in place of the whole milk, and when I rolled out the dough, I sprayed it with pam rather than putting more butter on top. I also used salted butter and decreased the salt in the recipe slightly.


This is my filling recipe, prepared the same way as the traditional:

Praline Filling Ingredients (for 1 loaf)
-1 3/4 c. ground pecans
-1/4 c. milk 
-1/4 stick butter
-1 beaten egg yolk
-1/2 c. packed brown sugar, plus 1-2 TBS white sugar
-1/4 tsp. butter extract


Potivica is prepared much like any other yeasted sweetbread at first. Yeast, milk, eggs, sweetener, oil or butter, flour, kneading...a good recipe for yum. 


After the rising, it's rolled out to a small-pizza sized round, and then really rolled out until it's almost paper-thin. 

(As you can see, I didn't quite get that far.)


After the rolling, it's time for the filling. I actually ended up using my hands for this, after I spooned it on, to make it nice and even. 


The loaves are rolled up, carpet-style, and then twisted in upon themselves in the loaf pans. I didn't get mine quite as swirly as I'd hoped, but I was worried I'd break them if I kept tugging. 


After the loaves come out, they have to cool for quite awhile or they'll turn to crumbly gook when sliced. 


Mmmmmmm....potivica. 

Thursday, October 13, 2011

Spinach Triangles (Spanikopita)

I really need to work on my "food-tography" skills.  Part of it's that I'm lazy and don't take as much time to set up shots as I ought to. Part of it's that I'm often taking pictures of dinner, which means often taking pictures without any good, natural lighting. Part of it's my camera; I think at this point an iPhone would be just as good. It was cheap when I bought it, and that was five years ago. One of my goals for this semester is to save up enough from my work to buy myself a decent camera. I still haven't decided whether to go for a high-endish point and shoot or just go whole hog and get an entry-level SLR. A lot of it will come down to the money. Anybody have any recommendations?

It's fall now, officially, and that means pumpkin. My favorite pumpkin recipe is my preschool teacher's Chocolate Chip Pumpkin Bread, and I had a lovely time making some a few days ago. It's the best pumpkin bread ever. Don't take my word for it. Try for yourself. You'll thank me later. Harriet's Chocolate Chip Pumpkin Bread.

I've always liked Pumpkin Bread, but for most of my childhood I despised spinach. Not only that, I despised cheese, except for parmesan. Luckily, that's changed, and hence I've come to enjoy many lovely dishes. One of them is spanikopita. Spanikopita is traditionally served as a casserole, but my family often prefers to make triangles, which are less messy to eat and can be easily popped in the toaster oven for reheating. The only slightly eccentric ingredient here is phyllo dough, but that should be easy enough to find in the grocery store's freezer aisle. Stick it in your own freezer where it'll keep for ages, then stick it in the fridge the night before you plan to make the triangles so it can thaw.

Also, just so y'all know, I do not claim this recipe as authentic in any way, shape, or form (although for all I know it's exactly how all the Greek grandmothers of the world make it); I just claim it to be delicious.

Ingredients (makes 18-21 small packets)
-1 TBS olive oil
-1 large onion or 2 small, diced
-3 cloves garlic, minced

-dried dill, basil, marjoram to taste (I used about 1.5 tsp of dill and 1/2 tsp of basil and marjoram)
-salt and pepper to taste (probably about 1/2 tsp. of each)

-1 10 oz. package of frozen spinach, preferably thawed (fresh is great too)
-1 egg
-3 tbl flour
-1 cup feta cheese
-1 cup cottage cheese (optional)
-18-21 sheets phyllo dough, thawed
-canola oil, olive oil, melted butter, or pam


Procedure
-place the olive oil and about 1/2 tsp of salt in a large saucepan over medium heat. Add the onion and herbs and cook for about 5 minutes until golden and soft. Add the garlic and cook 2-3 minutes more. 
-Add your spinach and cook, stirring occasionally, until the spinach is nicely incorporated and the mix is warmed through. If you're using thawed frozen spinach, this shouldn't take long. If you're silly like me and forget to thaw it first, you'll find yourself waiting awhile on this step...and possibly whacking at the frozen block with a cooking spoon. Whoops. Taste the mix and see if it needs more herbs. Remember that the feta will add saltiness. 
-Take the spinach mix off the heat and crack an egg into it. Add the flour, feta, and cottage cheese (if using). Mix well. 
-Now comes the fun part. Working with phyllo isn't that complicated once you get used to it, but it can be a bit tricky. The best advice I can give is to be very gentle and be  forgiving of yourself. If a piece rips, you can probably still use it. So don't worry. 
-Take the phyllo out of the package and gently lay it out on a countertop. Put a large cutting board beside the phyllo and very carefully move one sheet of phyllo from the pile to the cutting board. Brush gently with oil or melted butter, or spray with pam/olive oil. Repeat this with two more sheets (so you have a pile of three), then cover the remaining sheets with a clean dishtowel so they don't dry out. Each pile of three sheets will make three triangles.

-Cut the three sheets of phyllo into thirds, lengthwise, and place a heaped TBS of filling on the bottom of each piece. Now, here comes the tricky part. Take one corner of each piece and fold it diagonally over the filling to form a triangle. Then, fold the triangle towards the top of the sheet, so that the filling is closed off to the air on two sides. Continue to fold like a flag until you reach the top of the sheet, then tuck the ends under. If that description's too confusing to follow, watch the last minute of this video I just found on youtube: http://www.youtube.com/watch?v=FVnbFR4SnGU.
-Place the finished triangles on a greased baking sheet and cook at 350°F for about 20 minutes until crispy and golden. Alternatively, bake only as many as you want for your meal and freeze the remaining triangles to bake another day. 
-You could be properly organized and serve the triangles alongside a greek salad. Or you could have them with chips and guacamole (thanks, dad) and apples and honey (thanks, mom). No idea quite what inspired them to stick those sides on the table....


Monday, October 10, 2011

Hong Kong-Style Tofu

My first attempt at Hong Kong Tofu- Yunnan, China
When I lived in China I cooked--a lot. This was a result, I think, of being a vegetarian, having amazing fresh veggies/eggs/noodles/tofu at my disposal, needing to make sure most things I ate were cooked so as to avoid disease, and having simultaneously too much and too little free time on my hands. Cooking was, essentially, a slightly hectic equivalent of a stress ball. I could easily maintain control of it (most of the time), it provided some challenge,and it helped me relax.

My time in China was amazing, but it was also the most personally and professionally-challenging year I've experienced. I guess that's a big part of what made it so amazing. I'm still sorting through what I got out of my time in Yunnan and how the person I am now differs from the person I was last summer.

A market in Kunming, Yunnan, China

 My American co-worker last year, Mark, split his childhood between Rochester, NY, and Hong Kong. His father is a Hong Kong native, and although Mark always attended international school, at home he experienced a lot of Hong Kong culture, including his father's cooking. It took months and months of cajoling to get Mark to finally make Hong Kong Tofu for our middle school's team. Being the cooking geek I was, I stood behind him in his improvised kitchen, watching as he tossed marinated tofu from the wok into the air, jealous of his ability to somehow catch it all again instead of watching it splatter to the cement floor. (His advice, courtesy of his father: practice tossing cubes of bread first-- they're easy to clean up.)

The next day, I rode my bike into town, visited my "tofu lady" at the market, and bought a piece with which to attempt to recreate Mark's recipe. Of all the foods I miss from China, none perhaps matches my wish for freshly-made tofu. I'd eat the stuff raw. When I got back to the States and bought my first American tofu in over a year, the spongy texture and absolutely flavorless palette were almost more than I could take. I've readjusted, but, alas, I fear no tubbed grocery strore tofu can possibly match up to the majesty that is freshly-cut market tofu.

Well, I'll stop the China talk for the time being. Stick with this blog and you'll doubtless encounter more. Or you can check out my old China blog: http://anamericaninheqing.blogspot.com. For now, on to Mark's recipe (keeping in mind that neither he nor I was in possession of anything resembling measuring cups/spoons. This is all very approximate):

Ingredients (for marinade)
-1 standard package tofu, drained and pressed
-1/4 cup soy sauce
-2 TBS rice vinegar
-2 TBS rice wine
-2 TBS sesame oil
-2 cloves garlic, minced
-1 inch piece ginger, minced or grated
Marinating Tofu
-1 tsp. sugar or honey
-hot pepper powder to taste


Marinade Procedure: Pretty simple. Whisk all ingredients but the tofu together. Slice tofu into cubes and place in a wide, shallow dish. Add the marinade, flip tofu pieces a bit, and cover with plastic wrap. Let sit for at least a couple hours at room temperature, or (preferably) place in the fridge all day or overnight. It's worth tasting a piece or two of tofu an hour or so in to check for flavor balance. Add more of anything you like. 


Ingredients (other)
-1 TBS vegetable oil
-1 bunch of scallions, whites and greens chopped
-2 tsp. cornstarch
-1/4 cup water (plus more, if needed)


Procedure
-Heat the vegetable oil in the wok over medium-high and use a slotted spoon or spatula to place the tofu in the wok, leaving the bulk of the marinade in the dish. 
-Use a spatula or wok utensil to toss the tofu. You're not aiming for crispy here, but you do want it to get nice and hot.
-After a few minutes, remove the tofu to a plate or bowl, leaving the wok on the heat. Pour the water into the wok and add the cornstarch, letting the flavors crystalize as the sauce thickens slightly. 
-Add the tofu back in, along with the scallions and some of the marinade. You can continue to add all of the marinade if it's not flavorful enough. If it's too flavorful, you can add a bit more water to dilute it. 
-Continue to cook, tossing occasionally, until the sauce is nicely thickened--this definitely isn't a soupy dish. Any excess liquid will evaporate as you cook, or if you're in a hurry you can add a bit more cornstarch. 
-Serve over rice. For a more complete meal, add another stir-fried vegetable or two.


Hong Kong Tofu in Columbus, GA (with rice, bok choy, asparagus, and jasmine tea)

Sunday, October 9, 2011

Sometimes Simple is Just Best- Pasta with Eggplant and Marinara

I'm behind on my blogging. Very behind. I have several good excuses, however. I started a new job, I spent two weeks cramming like mad for the Foreign Service Test, and I celebrated two of the most important Jewish Holidays of the year. Still, that doesn't change the fact that I've not been blogging and that's rather unfortunate. I'm now back at it and intend to stay that way!


My favorite smells in the world are fresh basil and freshly ground coffee (not at the same time, of course). Coffee, luckily, is something I can smell all-year-round in the States, but basil is about to slip out of my life for some months. I already miss it.

Georgia changes seasons a little later than the northern parts of our beautiful country, so it's only in the last week or so that we've started to experience real fall. The recipe I'm posting today was a supper cooked right on the edge of summer, peaking over into autumn, but it's the sort of thing that's good any time and super easy to throw together. To be perfectly honest, this isn't even the sort of thing I'd typically use a recipe for. It's more of a formula that can be changed up as needed to accomodate different vegetables and the like.

Ingredients
-1 lb box pasta of choice (I prefer shapes to spaghetti-type noodles for this sort of chunkier sauce)
-2-3 TBS olive oil
-3-4 Japanese eggplant, ends trimmed, cut into strips (I prefer Japanese eggplant, but traditional round eggplant will also work)
-dried basil and oregano (for the eggplant)
-2-3 medium tomatoes
-1-2 small peppers (red are great if you have them, but whatever works for you)
-2-4 cloves of garlic, minced
-sprigs of fresh basil, leaves removed and cut or torn into smaller pieces
-1-2 cups of commercial tomato sauce or 1 can of diced or pureed tomatoes, undrained
-salt and pepper to taste
-parmesan cheese, to serve


Procedure
-Prepare the eggplant: preheat the oven to 450°F, brush some olive oil onto a baking sheet, and place the eggplant strips on top. Brush the strips with more olive oil and sprinkle with salt, pepper, dried basil, and dried oregano. Use a spatula to flip the strips around and try to get an even coat. Bake 15-20 minutes, until soft and slightly crispy. If the outsides are too pale for your liking, you can use the broiler for a few minutes at the end, but watch carefully so they don't burn!
-While the eggplant is baking, put up a pot of water to boil and prepare the pasta. 
-Chop the peppers and tomatoes into medium-sized chunks (large dice, perhaps)
-Heat a saucepan and swirl in about a tablespoon of olive oil, along with a bit of salt (kosher or other coarse is great, if you have it)
-Add the garlic and cook over medium-low heat, letting it slowly cook without browning. After a minute or two, add the peppers and cook together, then throw in the chopped tomatoes and basil. 


-Let simmer for a few minutes until the vegetables start to break down somewhat but the peppers retain a bit of crunch.
-Stir in the canned sauce or tomatoes. I almost always use tomatoes for this, but it so happened that when I made this a couple weeks ago we had half a can of tomato sauce that really needed using up. If you're using canned tomatoes, you'll likely want to add more salt and perhaps more oregano, and a little drizzle of balsamic or red wine vinegar is lovely.
-Leave to cook for another few minutes, until warm and bubbly. Season to taste.
-Mix the drained pasta with the eggplant and sauce and serve with grated cheese, and perhaps a fresh-baked loaf of sourdough. 


Friday, September 23, 2011

Shabbat Shalom! (Challah, Obviously)

 It's Friday evening here in Georgia, and the sun has tucked itself away momentarily behind a silvery cloud turned to gold at the edges (the sun may try to be inconspicuous, but, well, it's the sun). It's been a good day-- a very good day, in fact, as I just found out I've been hired!

When I got back to the States two months ago,  I took a few weeks to decompress before beginning job applications, and then, once I did, nothing worked out. I cobbled together a few little things-- a tutoring job and a Hebrew School gig-- but those were more for joy than for money (I was actually under the impression that the Hebrew School would be volunteer until I started teaching). Anyway, after a good month and a half of undesired unemployment, I'd pretty much resigned myself to the fact that none of the places I'd applied for nice part-time work were going to hire me, and I was ok with that. Between my two mini teaching jobs and my volunteer research for the museum, as well as participation in choir, almost daily workouts, and grad school applications, I felt mostly content.

So I was very surprised, an hour ago, when the very first restaurant I applied to called me back. I'm filling out paperwork Monday and starting training Tuesday. I'm a bit nervous, I must admit, about how this is going to affect my mostly-established-and-very-comfortable schedule. What a silly first-world, fortunate problem that is. Man, am I not in China anymore. Heck, I'm not even in unemployed America anymore, or won't be next week. I'll be getting experience as a server on a part-time basis, and I'll still get to do all the fun (and not so fun but necessary) stuff I've gotten involved with. I should be more nervous that I will drop dishes full of food on the people who will be tipping me, I suppose. Anyway, that has very little to do with this.

This is what one's hand is prone to look like after kneading challah. But it's worth it, I promise. 
Challah, for the uninitiated, is a traditional Jewish bread. It's a bit on the richer and the sweeter side than one's average loaf, but it's certainly nowhere near scones or muffins or banana bread or anything. It's a dense bread that's delicious plain, wonderful smeared with butter and honey, and stupendous turned into french toast. Challah is often eaten on shabbat, the Jewish Sabbath, which falls every Friday night along with the setting sun. Today happens to mark the first shabbat of autumn and the last before Rosh Hashanah (the Jewish New Year).

My family isn't devoted to a particular recipe. I'm partial to Mollie Katzen's, while my mother prefers...the bread machine book's. I will admit that there are advantages to the bread machine book's, like using the initial mix of orange juice and water, but challah to me just seems the sort of thing that must have a recipe attributable to somebody (preferably a great-great-great grandmother), and the bread machine book doesn't make the cut. Nonetheless, it wouldn't be me if I didn't make some small modifications to the original, so here you go. Emily's challah, mostly courtesy of Mollie Katzen, in all its glory. 

Ingredients (for one braid--can be easily doubled)
-1 1/4 cups of wrist-temperature water (or a mix of water and orange juice)
-1.5 tsp. yeast
-2 TBS oil or melted butter (butter is better, I think)
-1/4 c. sugar or honey (honey is oh-so-much better, if available)

-1 egg, plus about half another egg, for glaze

-1.5 tsp. salt
-a dash of cinnamon

-1/4 cup raisins (optional)

-4-5 cups all-purpose flour (can use up to 2 cups whole wheat, if you like, but I usually use only 1 cup, if any)
-poppy or sesame seeds for sprinkling


Procedure
-Put the water into a large bowl and sprinkle in the yeast. Then whisk in the oil or butter, sugar or honey, egg, cinnamon, and salt until nicely blended. If you're using raisins (and I can honestly go either way on that--I did today just because I hadn't for awhile and my sister, who hates them, is away at college), stir them on in. 
-Stir in the flour one cup at a time, moving from a whisk to a wooden spoon. When you've added 4 or 5 cups, the dough should be ever-so-slightly sticky. Knead it in the bowl for a few minutes, adding flour as necessary, until it's smooth and elastic. Then wrap it up in saran and let it double. This'll take 1-1.5 hours.


The challah looked quite happy to be in the world, and so did the green, green grass of the backyard. 
-After the dough's risen, you can stick it in a loaf pan and bake it like any other bread, but that's rather unusual for challah. Challah is nearly always braided. So, if you want to do this properly, cut the dough into thirds and roll each into a ball. You may have to redistribute the dough a bit to make the balls even. Roll each ball into a rope. If they're not approximately the same length, just pinch the end off of one and firmly stick it onto another. 

-Pinch the ends of the ropes together. Braiding begins from the middle and stays in the middle. If you know how to braid hair, you're in great shape. Just do that. If not, stick with me here. Take the middle rope, and bring it over the left rope, as in the picture below. Then, take the right rope, and bring it under the new middle rope (the original left rope), as in the second picture below. Then, take the new left rope (the original middle rope), and bring it under the new middle rope (the original right rope). You're basically going under whatever rope happens to be the current middle rope, alternating left to right and back again. But I know that sounds confusing, so I have creating, for your viewing pleasure, my very first food blog video (which has not been at all edited in any way, shape, or form, in case that isn't plainly obvious). 


-Once the braid is finished, place it on a greased baking sheet, cover with plastic wrap and a dish towel, and let rise for another hour. Shortly before the hour's up, preheat the oven to 375°F and beat an egg with a pinch of salt (you won't need the whole egg, so plan on omelets for dinner?).
-Before putting the bread in the oven, brush it generously with the egg wash and sprinkle with poppy or sesame seeds. You don't have to do this, strictly speaking, just as you don't have to braid the loaf, but not doing it is kinda akin to not putting lime in a gin and tonic. It just doesn't work as well. 
-Bake for 30-45 minutes, depending on your oven, until the loaf is golden-brown and sounds hollow when tapped on the bottom. Cool on a rack. 


Shabbat Shalom!

Friday, September 16, 2011

Bhangra Burrito


My parents both grew up with mothers who cooked. To be fair, I guess many children of the late 50s did, although not nearly so many turned into parents who cooked for their own kids. My Mom and Dad both did, and I'm grateful.


I associate my grandmothers' California kitchens with cookbooks. Lots of cookbooks. A few years ago, when I was visiting my grandma in Berkeley, The Rebar Modern Food Cookbook caught my eye. Rebar is a restaurant in Victoria that specializes in mostly-veggie, hippie cuisine, and my grandma had visited with her brother some time back.

Grandma, ever indulgent when it comes to her granddaughters, caught me pouring through the cookbook and said I could have it. It's become one of my very favorites. The recipes are imaginative but not weird, fanciful but not fancy (for the most part). A lot of what Rebar does is take staple recipes, like lasagne and cream of broccoli soup, and spin them into exciting variations. There are some awesome desserts as well, both classic and not, and there's a great section detailing methods for "basics" like peanut sauce, salsas, chile paste, and whole wheat pastry.

Rebar has two recipes for burritos. One is a more traditional take with beans and squash and corn. The other hops down to the subcontinent, producing a wrap that's essentially an easily-packaged packet of Indian curry. I made a few small changes to the original recipe to accomodate my family's pantry, but what's below is very close to what's in the book.

Ingredients
-4 garlic cloves
-1 inch piece of ginger, peeled
-1 hot pepper (jalepeno, poblano, whatever you've got)
-1 red pepper
-6 roma tomatoes (I didn't have these, so I used three small tomatoes, plus about a half cup of canned)


-3 TBS vegetable oil
-1 medium onion, diced
-1 tsp salt
-1/2 tsp ground cumin
-1 tsp ground coriander
-1 tsp sweet paprika
-1/4 tsp. tumeric
-1/2 tsp. (preferably freshly) ground pepper
-1 15-20 oz can chickpeas, rinsed and drained


-1.5 lbs potatoes, diced (we used russets-- the original called for red)


-1/2 cup cilantro, stemmed and chopped
-1.5 cups spinach or baby spinach, stemmed and sliced into ribbons 
-tortillas or wraps


Procedure
1) Roughly chop garlic, ginger, hot pepper, red pepper, and tomatoes, and put in a food processor until they form a course purée.


2) Put 2 TBS oil in a large pan and heat over medium. Sauté onion with half the salt until translucent, then add the cumin, coriander, paprika, tumeric and pepper. Add the purée from above and simmer 5-10 minute. Add chickpeas and cook another 5-10 minutes.


3)Meanwhile, pre-heat the oven to 450°F. Toss potatoes with the last TBS of oil and the remaining salt. Spread onto a baking sheet and roast until lightly golden and soft, about 15-20 minutes. Toss potatoes with the chickpea mix. 


4) Take a tortilla and spread spinach ribbons down the center, topped with a bit of cilantro. Spoon on curry, roll up, and place in an oiled baking dish. Repeat until out of filling. We made 6 tortillas, using 6-inch wraps, and had some filling left over. Cover and bake for 20-30 minutes until heated through and a bit crispy. We served ours with a bit of yogurt. Chutney would also be nice. 


Monday, September 12, 2011

Whole-Wheat Apple Pancakes (with a Twist)

Today is a no-workout day. The weather's a little gross, I feel a lot icky (not sick, just icky), and as 8 turned to 9 turned to noon, I eventually accepted the fact that my only exercise today would come from my little stroll about the neighborhood to put up "Found Puppy" signs.

You see, when my Dad went out to get the paper this morning, there was an itty bitty pug sleeping in one of the chairs on our front porch. For the following several hours, it continued to chill on our porch, wagging its tail, barking pitifully from time to time, and getting ever-so-very-excited whenever one of us ventured outdoors. My parents called the one family in the neighborhood we know owns a pug to make sure it wasn't their pet, but as it wasn't, and as my sister, my Mom, and my Dad all had places to get to, I ended up being left with the task of figuring out what to do with the little guy. ("Keep him" was my initial suggestion, but... vetoed.) So it was that I printed off some fliers, grabbed some thumb tacks, and went out on a stroll. The pug followed. He's a very friendly pug.

Partway through our walk I encountered another lady walking her dog. This lady knew of a neighbor who owned 2 pugs and said that she'd take our small, tail-wagging friend home with her until someone claimed him. I'd be lying if I said that my relief at no longer having a lost doggie around didn't mingle with disappointment at giving up the closest thing I'd ever had to a canine of my own.

Anyway, as I am in the midst of a lazy day, I thought I'd tell you folks about my lazy Sunday morning breakfast yesterday. My favorite recipes for really awesome bread generally come from The Tassajara Bread Book by Edward Espe Brown. (For my full love letter to this cook book, see this, which is on my old food blog.) On Saturday afternoon, I was looking for inspiration for what to do next with my sourdough starter, and I stumbled upon Brown's "Sourdough Pancakes" recipe. I ended up adding a bunch of flour, but I think the basic concept is pretty awesome. The pancakes turn out richly-flavored but still sweet and rather amazing with maple syrup. Honey would be good too, I imagine. Recipe's below. My modifications are noted.

Ingredients- Night Before Breakfast
-1/2 cup sourdough starter
-2.5 whole wheat flour
-2 cups warm water


Procedure: Measure into a large bowl and mix thoroughly


Ingredients- Morning
-1 egg, beaten
(Ain't that pretty?)
-2 TBS corn oil (I didn't have any, so I subbed canola)
-3/4 cup milk
-1 tsp. salt
-1 tsp. baking soda
-spices as desired (I used about a tsp. of cinnamon and a dash of nutmeg)
-2 TBS brown sugar
- about 1 cup all-purpose flour (this wasn't in the recipe, but I found the original way too thin and a bit heavy. In the future, I might also sub out some of the whole wheat flour in the flour/water/starter mix for all-purpose or whole-wheat pastry)
-1 large apple, diced (or any other fruit, nuts, seeds, oats, chocolate chips, etc. Or make them plain)


Procedure:
-Measure out 1/2 cup of the mix from the night before and add back to the sourdough starter.
-Mix the egg, oil, and milk into the flour/water mix
-Mix the flour in. 
-Combine the salt, soda, spices, and sugar and sprinkle over the batter, then gently fold in. Same with the apples.
 -Let sit for a few minutes before frying. Brown says that small pancakes generally work better than larger. 


Thursday, September 8, 2011

Sourdough-- Bittman Style

Well, hello everybody, and welcome to the chronicle of my cooking and baking adventures down here in Georgia. I could, I suppose, begin with some sort of self-introduction, but I assume that most people reading this already know me, and that those who don't are far more interested in recipes than in revealing personal tidbits. I will say that what you're most likely to find in this blog is a mix of recipes penned by my favorite chefs and recipes designed on the fly as I satisfy my culinary cravings and curiosities. I love to cook, but my deepest food passion is for baking (hence the blog title). It seems only fitting that I begin with bread. This bread, to be precise:


This bread is the sourdough loaf I learned about in Mark Bittman's The Art of Cooking Everything Vegetarian. I'm a pretty big fan of Mark Bittman's (he's a food writer for the NYT; if you haven't checked him out, you should), but I'd never read anything of his not linked to the Times until stumbling upon his cookbook at the library last week. 

Sourdough is an elusive creature, made thus by the fact that it relies on a starter. I have dreams of one day sneaking into the bustling kitchen at Boudin's, snagging a fistful of that century-old, solid-gold mass of sour goop and secreting it back to my own refrigerator. But, considering that Boudin's is in San Francisco and I am here, I've had to settle for less. Which is just as well, considering that stealing Boudin's starter would likely lead to unpleasant consequences. 

Sourdough starter isn't very difficult to make, but it does require time and patience and luck. In fact, making a loaf of sourdough bread start to finish is a several-day process, because the starter itself needs a few days prior to mixing the bread dough, and then there's typically a long rising period. And then, even after all the hard work and the waiting and waiting, there's no knowing how sour your bread will taste. Starters certainly do age well, as long as they're fed, but it might take a few weeks, or even longer, before breads baked with it have the traditional sour taste I associate with so many wonderful California bakeries. Even then, it might not match up ( Northern California yeast is just really quite excellent), but that shouldn't stop you from trying! Sourdough is exciting! Each starter, and thus each loaf resulting from it, is a unique concoction of taste and texture dependent not just on the commercial yeast you begin with but on the natural yeasts hanging around your environment. This is most certainly a locally-powdered bread. So, have at! At the least, you'll get a beautiful , deeply-flavored loaf lovely for sandwiches and smears of butter. 

We begin with the starter:

Ingredients
-1.5 cups bread flour
-1/8 tsp. yeast (yes, that's all)
-1 cup wrist-temperature water

Procedure: Combine flour, yeast, and water in a large bowl, mix with a wooden spoon, cover loosely (so natural yeasts can join what's already inside), and tuck into an out-of-the-way spot. Stir every 8-12 hours and wait patiently for it to get bubbly and develop a bit of a sour smell. In most climates, this'll likely take 2-3 days. In Georgia summer, it took one. 

Once the starter's mature, you can begin the bread. But, if you aren't going to be baking right away, stick the starter in the fridge. When the time to bake comes, you're ready for step two: Bread Baking Eve.

Ingredients
-starter
-2 cups of bread flour (I sometimes use part all-purpose whole-wheat)
-1.5 cups wrist-temperature water

Procedure: If you've made the starter according to Bittman's directions, you use all of it during this step (don't worry-- you'll get a lot of it back later). Dump the starter into a large bowl and mix in the flour and water until smooth. Cover the bowl with plastic wrap and let it sit at room temperature for at least 6 hours or overnight. It will get bubbly and foam a bit. And do make sure you use a large bowl--I didn't the first time and ended up with the blob all over my counter. Whoops. 

Sleep well, and dream of good bread. When morning comes, your bowl should look something like this. (do excuse the quality of my photographs. I have a very temperamental camera that I hope to replace soon.) 
Ingredients
-1 cup bread flour
-1 cup rye flour (if you don't have it, all-purpose, bread, or whole wheat will be fine. Again, it'll affect texture and flavor to some extent, but I've baked with and without rye flour and it's good both ways)
-1/2 tsp. yeast
-2 tsp. salt

Procedure: 
1) Transfer half of the starter/flour mix to a covered container and stick it back into the fridge until the next time you bake bread. 
2) Dump the other half...into a food processor. Yeah, I know. For some people this probably sounds like a heavenly prospect, while for others (myself included) it seems simply unthinkable. Machine-kneaded bread? What is this, the 1950s? I love the hands-on element of bread baking. But, for sourdough at least, this really works. 
3) Add the bread flour, rye flour, yeast, and salt to the food processor and turn it on for about a minute. The ingredients should meld into a moist and well-defined ball. If it's too sticky, add flour a few tablespoons at a time. If it's too dry, add a little water.  Process for 5-10 seconds after each addition. 
4) Put the dough into a large bowl, cover with plastic wrap, and leave at room temperature for at least an hour.
5) Lightly flour a countertop, and shape the dough into a boule or a baguette or whatever you like, really. (To make a boule, form the dough into a ball and then stretch it by lightly pulling the dough from the center out to the sides and tucking it under. Make a "seam" on the bottom of the loaf by tightly pinching the tucked-under bits together.) Cover with plastic wrap or a damp towel and let it rest and rise while you pre-heat the oven to 400°F. 
6) When the oven is pre-heated, transfer the loaf to a greased baking sheet and score it a couple times with a sharp knife. Turn the oven down to 375°F and put the bread in. Make sure there's not a baking rack too close above the one the bread is on, because these loaves PUFF, I tell you. 
7) Unlike most bread recipes, which specify a baking time, Mark Bittman recommends an internal thermometer.  He says that the internal temperature of the loaf should be at least 210°F, which for me meant baking the bread past its initial "golden brown and hollow sounding" stage. What looked and felt like a done loaf was, according to Mark Bittman, 20 degrees shy of where it needed to be. So, if you have a thermometer, use it; if not, bake the bread longer than you think you need to--probably at least 40-50 minutes, although each oven is different. 
8) When the bread has reached the desired temperature, stick it on a rack to cool, slice in, and smile. You've just made sourdough.